[안드로이드] 레이아웃이란?
레이아웃은 사용자가 화면을 구성하기 위한 틀인데 간단히 말하면 내가 원하는 곳에 물건을 놓기 위한 방이나
그림을 그릴 캔버스? 정도로 생각하면 편한 것 같다.
안드로이드 앱을 만들어 보면서 화면을 구성할 때 가장 기본이 되는 것이 레이아웃이기 때문에
오늘은 레이아웃에 대해 간단히 적어본다.
1. 레이아웃
레이아웃은 위젯을 배치하는 틀로서, 앱에서 사용자 인터페이스를 위한 구조를 정의하고 View와 ViewGroup 객체의 계층 구조를 사용하여 빌드된다.
View 객체는 일반적으로 ‘위젯’이라고 하고 Button이나 TextView 같은 여러 서브클래스 중 하나다. ViewGourp 객체는 일반적으로 ‘레이아웃’이라고 하며 ‘LinearLayout’이나 ‘ConstraintLayout’ 등 여러 종류가 있다.
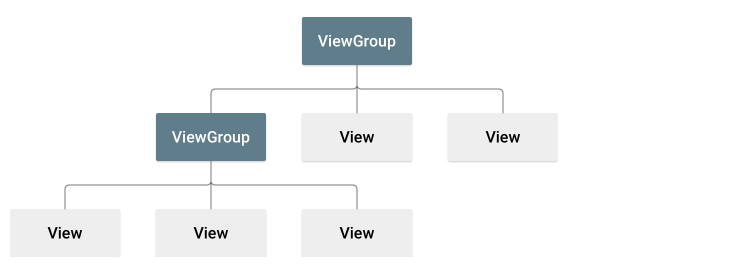
ex) UI 레이아웃을 정의하는 뷰 계층 구조
2. 레이아웃 종류
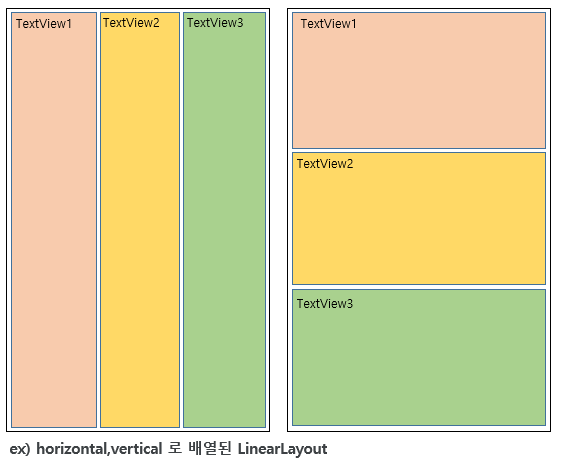
2.1 LinearLayout
기본적인 레이아웃으로 가장 많이 사용된다. 박스형 모델로 orientaltion 옵션을 사용하여 위에서 아래방향 혹은 왼쪽에서 오른쪽 방향으로 뷰를 추가하며 화면을 구성할 수 있다. weight 옵션으로 위젯이 차지하는 영역을 조절할 수 있다.
1
2
3
4
5
6
7
8
9
10
11
12
13
14
15
16
17
18
19
20
21
<LinearLayout xmlns:android="http://schemas.android.com/apk/res/android"
    android:layout_width="match_parent"
    android:layout_height="match_parent"
    android:orientation="vertical"  //vertical : 위->아래, horizontal : 좌->우

    <TextView
        android:layout_width="match_parent"
        android:layout_height="match_parent"
        android:layout_weight="1" />

    <TextView
        android:layout_width="match_parent"
        android:layout_height="match_parent"
        android:layout_weight="1" />

    <TextView
        android:layout_width="match_parent"
        android:layout_height="match_parent"
        android:layout_weight="1" />

</LinearLayout>
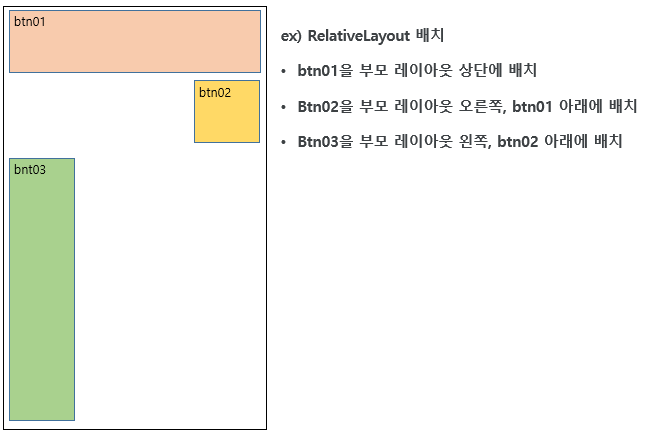
2.2 ReleativeLayout
상대적 레이아웃은 규칙기반의 모델로 부모 컨테이너나 다른 뷰와 상대적 위치로 화면을 구성하는 레이아웃이다.
1
2
3
4
5
6
7
8
9
10
11
12
13
14
15
16
17
18
19
20
21
22
23
24
25
<RelativeLayout xmlns:android="http://schemas.android.com/apk/res/android"
    android:layout_width="match_parent"
    android:layout_height="match_parent" >

    <Button android:id="@+id/btn01"
        android:layout_width="match_parent"
        android:layout_height="wrap_content"
        android:layout_alignParentTop="true"
        android:text="Button" />

    <Button android:id="@+id/btn02"
        android:layout_width="wrap_content"
        android:layout_height="wrap_content"
        android:layout_alignParentRight="true"
        android:layout_below="@+id/btn01"
        android:text="Button" />

    <Button android:id="@+id/btn03"
        android:layout_width="wrap_content"
        android:layout_height="match_parent"
        android:layout_alignParentLeft="true"
        android:layout_below="@+id/btn02"
        android:text="Button" />

</RelativeLayout>
2.3 Constraint Layout
제약 레이아웃은 제약조건인 연결선을 통해 뷰를 배치한다. 뷰의 사방에 위치한 연결점을 다른 레이아웃이나 위젯의 연결점에 연결하여 화면을 구성한다. 안드로이드 스튜디오에서 Actiivty를 하면 자동으로 생성되는 xml파일의 디폴트 레이아웃이다.
1
2
3
4
5
6
7
8
9
10
<androidx.constraintlayout.widget.ConstraintLayout
    xmlns:android="http://schemas.android.com/apk/res/android"
    xmlns:app="http://schemas.android.com/apk/res-auto"
    xmlns:tools="http://schemas.android.com/tools"

    android:layout_width="match_parent"
    android:layout_height="match_parent"
    tools:context=".LayoutSample">

</androidx.constraintlayout.widget.ConstraintLayout>
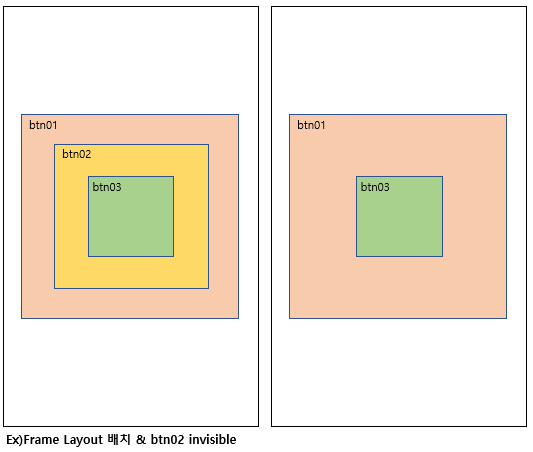
2.4 Frame Layout
싱글모델로 여러개의 뷰가 중첩되어 있는 구조로, 가장 나중에 추가된 뷰가 가장 위에서 보인다. 아래있는 뷰가 위에있는 뷰보다 작다면 보이지 않을 수 있으며 visibility 옵션을 통해 보이고 안보이고 여부를 결정할 수 있다. 버튼을 탭처럼 구현하여 화면을 보여주기 유용하다.
1
2
3
4
5
6
7
8
9
10
11
12
13
14
15
16
17
18
19
20
21
22
23
<FrameLayout
    android:layout_width="match_parent"
    android:layout_height="match_parent" >

    <Button
        android:layout_width="350dp"
        android:layout_height="350dp"
        android:layout_gravity="center_vertical|center"
         android:visibility="visible" />

    <Button
        android:layout_width="250dp"
        android:layout_height="250dp"
        android:layout_gravity="center_vertical|center"
         android:visibility="invisible" />  //보이지 않음

    <Button
        android:layout_width="150dp"
        android:layout_height="150dp"
        android:layout_gravity="center_vertical|center"
         android:visibility="visible" />

</FrameLayout>
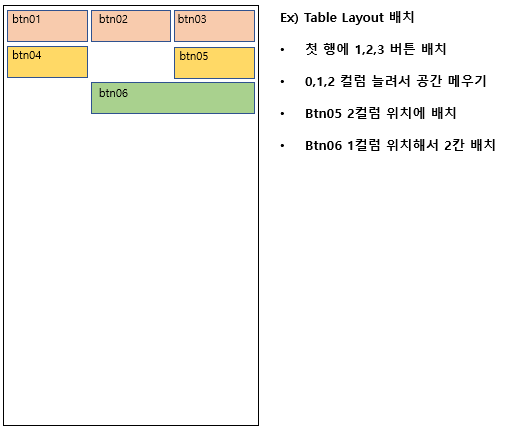
2.5 Table Layout
격자모델로 격자모양의 배열을 사용해서 화면을 구성한다. 엑셀의 표처럼 사용이 가능하고 크기나 모양, 테두리 색 등 변경이 가능하다. Linear Layout으로도 대부분 구현이 가능해서 잘 쓰이지 편이다.
1
2
3
4
5
6
7
8
9
10
11
12
13
14
15
16
17
18
19
20
21
22
23
24
25
26
27
28
29
30
31
32
33
34
35
36
37
38
39
40
41
42
43
44
45
46
47
48
<TableLayout
    android:layout_width="match_parent"
    android:layout_height="match_parent"
    android:stretchColumns="0,1,2">   //0,1,2 컬럼을 늘려 빈공간 채우기

    <TableRow
        android:layout_width="match_parent"
        android:layout_height="match_parent" >

        <button
            android:layout_width="wrap_content"
            android:layout_height="wrap_content" />

        <button
            android:layout_width="wrap_content"
            android:layout_height="wrap_content" />

        <button
            android:layout_width="wrap_content"
            android:layout_height="wrap_content" />
    </TableRow>

    <TableRow
        android:layout_width="match_parent"
        android:layout_height="match_parent" >

        <button
            android:layout_width="wrap_content"
            android:layout_height="wrap_content" />

        <button
            android:layout_width="wrap_content"
            android:layout_height="wrap_content"
            android:layout_column="2" />  //2번 컬럼에 위치
    </TableRow>

    <TableRow
        android:layout_width="match_parent"
        android:layout_height="match_parent" >

        <button
            android:layout_width="wrap_content"
            android:layout_height="wrap_content"
            android:layout_column="1"   //1번 컬럼에 위치
            android:layout_span ="2" /> //길이를 2칸 차지
    </TableRow>

</TableLayout>